
Woven shirts come in a variety of styles, fabrics, and weights. You have lightweight pinpoint cotton dress shirts, oxford dress shirts, denim shirts, twill shirts, camp shirts, work shirts, and even fishing shirts. The styles may overlap in some of these, but the weights and fabrics are entirely different. Many of the woven shirts have a placket in the front.
The way that they are all treated for embroidery is about the same. By that I mean, you will use the same type of backings, needles, and threads. In some cases, the settings in your design will need to be adjusted for the different weights of fabrics. In the videos, I am working on a denim shirt.

Left chest embroidery on a woven shirt is normally done above the pocket. If your design is more than two inches or so high, it might be best to embroider it on the right chest. This would also depend on the size of the shirt. If the shirt is an X Large or above your design can be a little taller. If you are going to be embroidering on the right chest, the logo should be placed directly across from and centered to the top of the pocket. In these videos, I show you how to embroider just above the pocket.
If you are going to be embroidering a monogram, the placement should be on the pocket rather than above.
 To watch the videos in full-screen mode, click on the “Enter Full Screen” icon on the right bottom corner of the video.
Video: Embroidery Design Placement Above The Pocket
In this embroidery training video, I show you how to place the embroidered logo or design above the pocket on a denim shirt. It is very important to always remember that you are going to use the pocket edges as your point to line up the design, not the shoulder line or the center of the shirt.
Video: How To Hoop For An Embroidery Design Above The Pocket
In this embroidery training video, I show you how to hoop for your embroidered design above a pocket on a woven shirt. You must use the correct hoop. I also show you a tip to keep the pocket edge from sliding down as you are hooping it. This applies to any type of shirt pocket, including t-shirts and polo / golf shirts.
Video: Sewing Embroidery Design Above The Pocket
In the embroidery training video, I show you how to place the hooped shirt into the embroidery machine and line it up to begin sewing the embroidery design above the pocket.
Video: Embroidery Tip-Embroidery Design Above Pocket
This embroidery tip will show you how to place an embroidery design or logo above a pocket to prevent it from looking crooked. This is very important. This principal applies to any garment you are going to embroider that has a pocket.

A woven shirt can be embroidered in the center back for a full back, across the entire back yoke, in the center just above the yoke seam line, and on either shoulder. If the shirt has pleats in the back, you must be careful that you do not run into the pleats. It is very difficult to hoop when you have pleats. If there are pleats in the back, it is best to direct your customer to another location that will still give them good visibility with their logo.
Video: Embroidery Design Placement On The Back Yoke
In this embroidery training video, I show you where to place the embroidery design on the back yoke of a woven shirt. There is more than one placement, but in this video I am showing you the most common placement. Many times the customer wants it just below the collar. If that is the case, you will need to remove the label. You must be careful that it does not run into the label on the back of the shirt.
This can sometimes distort the logo. I will usually discourage the customer from placing it just under the collar. That placement is great for a knit shirt such as a polo shirt, golf shirt or a staff shirt.

Embroidery on a woven shirt collar can be done in a variety of ways if you have certain tools to do them with. The procedure that I show you here is very simple. You do not need any tools other than what you normally carry. This is a method that I developed many years ago before they had clamping systems and the open hooping frames that work with the sticky backing. I had to figure it out with exactly what I had. It works! I am not a fan of the sticky backing. I have found that it gums up the needles and sometimes causes skipped stitches. I would rather spray my backing with the applique adhesive. It is much easier to remove when you are finished with the job.
Video: Collar Embroidery Design Placement
In this embroidery training video, I show you the embroidery design placement on the collar of a woven shirt. For this video, I am showing you a diagonal placement on the collar. It can also be placed vertically or horizontally. This will work on any ladies or man’s shirt that has a button down collar. The design can be placed slightly lower if it is a shirt collar without a button hole.
Video: How To Hoop Collar For Embroidery Design
In this embroidery training video, I show you how to place the collar for embroidery into the Vinyl Window or Template that I created for holding hard to hoop embroidery items. This way is simple and works very well when you do not have the Hoop Tech hooping clamps or Fast Frames.
Video: Sewing Out Collar Embroidery Design
In this embroidery training video, I show you how to place the hooped woven shirt collar into the embroidery machine and sew out the design. This is done using the vinyl window or template that I created in the video under Hooping. If you have Fast Frames, they will also work using this same principle. You can substitute with adhesive backing or use spray tack on your regular backing. Both options will work for this type of application.

Embroidery can be done on woven shirt sleeves in several locations. You can embroider at the top of the sleeve, vertically down the sleeve, at the lower part of the sleeve, and on the cuff. The most common area is either the left or the right cuff. Below is an article that I wrote about how to embroider a monogram on a shirt cuff.
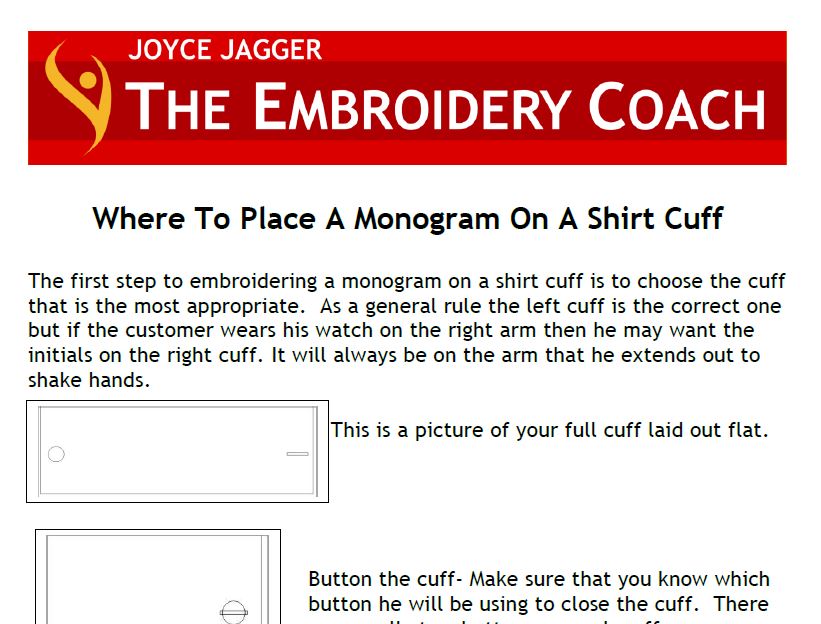
Article: Where To Place A Monogram On A Shirt Cuff
In this monogram placement article, I show you where to place a monogram on a man’s or ladies shirt cuff. As a general rule, the left cuff is the correct one to embroider. However, if the customer wears a watch on the right arm, then he or she may want their monogram on the right cuff.
Link to Article: Monogram Placement on a Shirt Cuff