
Hats or Caps are not hard to embroider but there are many issues that can be created that you need to look out for. The first video to watch is Basic Information. This will show you many different types of caps. This will help you to avoid a lot of issues and pitfalls along the way as you are working with the caps.
Caps can be embroidered on the front, back and on each side. I have videos showing you how to do all of these applications.

This is were you should start with learning how to embroider on caps. This will give you the basic information about the different types of caps and what you can do to avoid many issues and pitfalls as you are embroidering on them. This will also help you to work with the heavy caps like the FlexFit caps. They are known to cause issues, but by watching these videos and applying the information that I give you, you will learn that they are not as bad as they appear to be!
 To watch the videos in full-screen mode, click on the “Enter Full Screen” icon on the right bottom corner of the video.
Video: Basic Cap Information
In this embroidery training video, I will show you various types of basic caps that are the most popular to embroider and discuss some of the differences between them. I will explain the difference between structured and unstructured caps and show you examples of each one. I also show you some Flexfit caps.
Video: How To Eliminate Cap Problems
In this video, I want to show you how to eliminate some of the problem with heavily structured and shaped cap fronts. I am working with a very stiff FlexFit cap with a rounded crown. Many people have issues with thread breaks, needle breaks, and registration on this type of cap.
If you will follow what I show you in this video, it will eliminate about 90% of your cap problems. I regularly embroider on this type of cap with 75/11 and 70/10 sharp needles, not the 80/12 needles that many people teach you to use. Using my method works!
Video: Adjusting The Cap Drivers
In this video, I show you where to adjust the tajima cap driver for different cap heights when it is necessary. Depending on the year and model of your embroidery machine, you may have 2 or 3 different cap height adjustments. The cap driver in this video is an older style and has 3. The newer model cap drivers have 2 positions but adjust exactly the same.
- Low Profile – hats with short crowns
- Mid Profile – This is your average athletic or uniform cap
- High Profile – Truckers caps with tall crowns only
Most cap drivers, regardless of embroidery machine brand, have adjustments that will allow you to move the plates on the front of the driver forward or back to allow for different cap heights. This is very important! Check your machine manual or the cap driver itself to see where and how to make that adjustment.

Embroidery on caps is a real money maker. You should learn to master the art of embroidering on cap fronts. On most embroidery machines, you can embroider the cap front and sides in one operation. Many people are afraid of this type of application and cannot seem to embroider the sides straight when they try this method. That is only because they have not been taught properly how to hoop the cap. It is all in the feel of it.
Once you get the method down, you will realize how much time you have wasted in both setting up your designs and embroidering the front and the side separately.
Article: Creating a Permanent Cap Grip Template for Setting Up Cap Designs To Sew On Front & Sides
In this embroidery article, I show you, step by step, how to set up the designs for your cap so that you can embroider the front & sides of the cap is one operation. You must have the wide cap frames for this to be possible. Today, most embroidery machines come equipped with the wide cap frames. I have created my Cap Grid in the Tajima by Pulse software, but this method works the same in all embroidery software.
Link to Article:Setting Up A Permanent Cap Grid Template
Video: 6 Panel Cap-How To Hoop For Embroidery On Front & Sides
In this embroidery training video, I show you how to hoop a 6 panel cap for custom embroidery on the center front and on each side. Hooping a 6 panel cap for embroidery on the front and one side would be exactly the same process.
I have also included a link to the article “How To Set Up The Embroidery Designs For The Front And Sides Creating A Permanent Cap Grid”. This will show you how I set up the designs for my caps to sew out on the front and the sides in one hooping. Print out this information and keep it in your Embroidery Information binder for future reference. I used the Tajima by Pulse DGML embroidery software to set up this grid but the principals are the same in any embroidery software. Your tools may have different names and locations, but the settings and principles will be the same for all embroidery software.
Link to Article: Setting Up A Permanent Cap Grid Template
Video: Sewing Embroidery On Front & Sides In One Application
In this embroidery training video, I show you how to sew out the embroidery design on the center front and each side of the cap in one application. This is a huge time saver and must be set up in your software in order to have all 3 designs run simultaneously.
Video: Unstructured Cap-Hooping a Cap Front For Embroidery
In this embroidery training video, I show you how to hoop an unstructured cap. A unstructured cap is one that does not have any backing or any type of stiffening fabric sewn into the back portion of the cap front. Most unstructured caps are low profile caps so you must make sure you have your Cap Driver set for a low profile cap.
Video: Stitching An Embroidery Design On Unstructured Cap Fronts
In this embroidery training video, I show you how to embroider on the front of a 6 panel unstructured cap. I use a template to line up my design before I start the actual stitching process.
Video: How To Embroider A Puff Or Foam Design On Caps
In this embroidery training video, I show you how to embroider a foam or puff embroidery design on a cap. Puff or Foam embroidery can also be done on other garments as well as caps. You must be very careful when you are selecting garments for Puff or Foam embroidery. The finished Puff or Foam embroidery cannot be dry cleaned because of the foam being used in the design. Puff designs do not always launder well either.
In the Design Creation area of the website you will find instructions on How To Create Your Design For The Puff Or Foam Embroidery.
Video: Design Sewing Correctly For A Cap
In this video, I want to show you the proper sewing sequence for a cap design. Ideally, the logo should sew from the bottom up and the center out. If you are setting up your designs, make sure that you select the option to sew your lettering from the center out. Always start with the bottom row of lettering first. This helps to anchor the cap close to the bill which helps to eliminate distortion. If you are having your designs digitized, make sure to tell the digitizer that it is for a cap and must start at the bottom and sew from the center out.
Video: Editing A Left Chest Design To Work For A Cap
In this video, I show you how to take a design that was digitized for a left chest and edit it to work for a cap. You will need to have editing software to be able to do this. If you already have a design for a left chest that you like that runs great, you can in fact edit it to work for a cap!
I also add it to the cap grid, add lettering to the sides of the cap, and go through the underlay settings to make it easier for you.

The videos in this series will show you how to embroider on cap backs. There are several ways to hoop them, but I show you a simple method that has worked for me for years. I do not use any expensive equipment to do this. I use the same simple method that I developed 30 years ago!
I do not recommend Fast Frames for hooping cap backs. They often do not hold tight enough to get the quality that I am always looking for.
Today there are many different hooping systems for caps and cap backs. HoopMaster has a separate cap back attachment for the freestyle base and Hoop Tech offers a cap back clamp that mounts to your cap driver. Both of these systems work very well. Unfortunately, many of these specialty items can be very costly and not within a small shop or home embroiderers budget. The method I show you is easy, fast, and will not cost extra. I also created a simple hooping board to make it go faster because I had 3 multi-head machines. I have included instructions for you to make your own.
Video: How To Hoop Cap A Back For An Embroidery Design
In the embroidery training video, I show you how to hoop the back of a cap for your embroidery design without the help of a hooping device. Yes, It is easier with a hooping device, but this method is very simple, quick, and easy to do even without a hooping device. Everyone has a table corner that they can use to hoop a cap back on. It is easier and quicker if you have the cap back template to set the base of your hoop in, and I give you a pattern for that in the link below. Go to the Cap Back Hooping Board Template Pattern that I created to see how I hooped cap backs for many years.
Link to Template: Hooping Board Template
Video: Sewing Out A Design On The Embroidery Machine
In this embroidery training video, I show you how to place the hooped cap back into the embroidery machine, position the backing, line it up, trace it, and embroider the design. The design must be programmed upside down or at 180 degrees. This can be done in the software or in the machine.
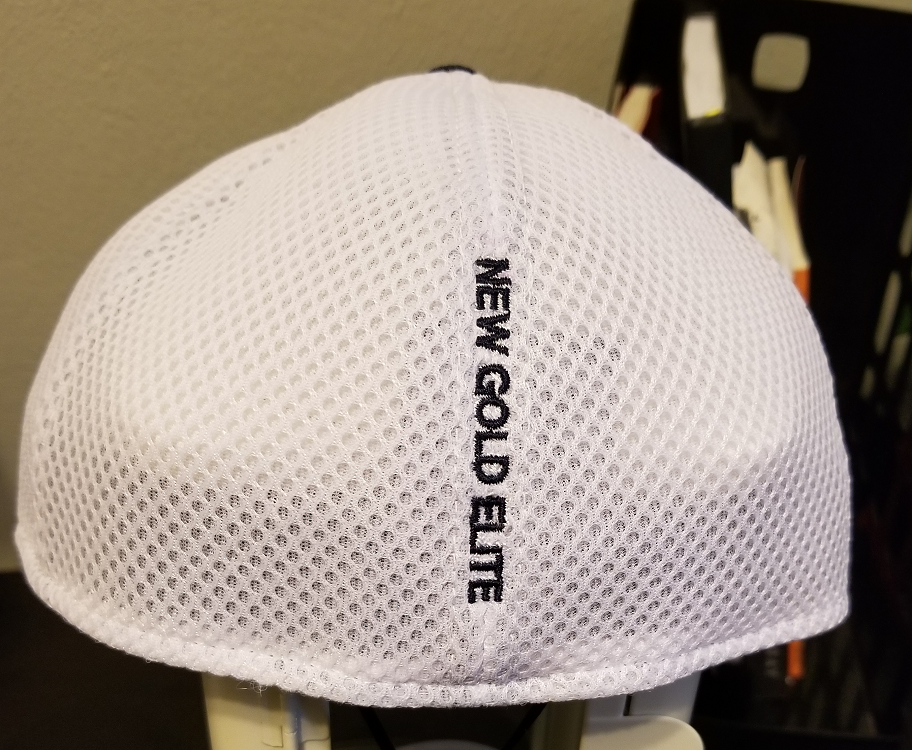
Article: How To Embroider Vertically On A Cap Back
Here is an article on how to embroider vertically on a cap back. I had to do a project for Wearables Magazine so I wrote up the how to for the magazine and I wanted to share it with you. I got the idea from Linda Gadwood. She had a customer that requested this type of embroidery so she was able to make her customer happy. When Wearables contacted me wanted a new idea or technique for their “Decorating Solutions” section of the magazine, I decided to give that a try. You can download the article, print it out and use it to create your own vertical embroidery for your customers. Give it a try! It was not hard at all!
Sewing a Horizontal Line of Lettering On The Back Of A Mesh Cap

This section covers both knit caps and the bucket caps. Each one is embroidered differently. The Knit cap is treated like a knit fabric and hooped in a standard tubular hoop or frame with cutaway backing and soluble film topping. The Bucket cap is embroidered very much like a regular cap using the standard cap frame.
Video: Knit Cap – How To Hoop For Embroidery Design
In this embroidery training video, I show you how to hoop a knit beanie cap. This cap has a cuff that is turned up. Because of that, I will turn it inside out and embroider the logo right side up. If you do NOT have a cuff on the cap then you will NOT turn it inside out, and you will embroider the logo upside down at 180 degrees. This is a knit so you will use both cutaway backing or stabilizer and topping. A soft cutaway backing or stabilizer, such as a no show or mesh, works very well for this application. You can also use the Cap Back Hooping Board, the Free style portion of the HoopMaster, or the fold down arm of the All-in-one hooping device to hoop the knit cap.
In this video, I did not use a topping when I hooped the knit cap. It is easier to hoop the cap without the topping when you do not have a hooping device. After you have it hooped, lay the topping on top of the hooped cap and tape the edge of the topping in along with the edge of the cap. You will understand more once you watch the video. If you have a hooping device, I recommend hooping a strip of topping in through the area. It is much more stable that way.
Video: Hooping A Bucket Cap For Embroidery Design
In this embroidery training video, I show you how to hoop a bucket cap. Hooping a bucket cap is very similar to hooping any other type of cap. Many people are very hesitant of even trying to work with bucket caps. After you watch the video and practice a few times, you will find out that they are relatively easy.
Because of the design of bucket caps, you have a limited area to embroider in. The design that you choose will need to be smaller. The bucket cap that I use in this video has a stripe on it so the design cannot be any larger than 1.5 inches.
There are some caps or hats that have wider brims than the normal bucket caps. They are more difficult to hoop but must be handled exactly the same way.