
I have some basic rules and Embroidery Placement Guides that have worked well for me over the years. I will share those with you as we go along in the placement videos. For the most part, there are no hard and fast rules. The customer is the one that dictates where the location will be that will make him or her happy. I will share the guidelines and placement charts that I have developed and used for many years.
Marking Your Design Location
I have found that it is best to mark the first garment of each size for the correct placement when you are starting a job even if you are using a hooping device. This will insure that you are placing your embroidery in the exact location on every garment.
 To watch the videos in full-screen mode, click on the “Enter Full Screen” icon on the right bottom corner of the video.
Video: Marking Tools For Garments
There are specific embroidery marking tools that I find very important to have when I want to place a mark on a garment to find the exact location or placement for my embroidery design. This embroidery training video will show you each of these important tools.
The marking grids that I use can be purchased through our Embroidery Store. Some of the other tools are found at your local sewing machine store and some are available through your embroidery supply house.
I have found that the bar of soap is one of the best marking tools that I have ever used. It can be removed very easily by rubbing the mark with a cloth or a piece of backing. Do not over apply it. As with any fabric marker, the more you put on the harder it is to remove. I keep all of my hotel soaps that I get when traveling. I use them to wash my hands with until they are flat and sharp then let them dry out good before using. Do not use a soap that has cold cream or added oils in it.
Video: Design Placement
This is a video that I created during one of my trainings. This will help you understand placement better and how important it is to be consistent with your placement. There are many variables to most placements, but you need to have a basic placement system to start with. It makes the process easier even if you have an unusual placement.
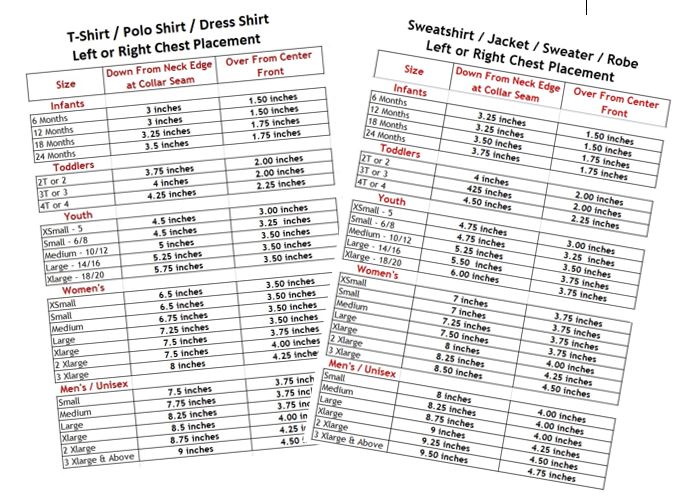
Chart: Placement Chart For Left Or Right Chest Embroidery Design Placement
This embroidery design placement chart is designed for the Left/Right Embroidery Design Placement for most left or right chest applications, but there are specific factors you must take into consideration when placing logos on the left or right chest of shirts, jackets, and sweaters.
The measurements on the chart are from the center of your design NOT THE BOTTOM OF YOUR DESIGN! Always plan from the center of your design. If in doubt, print out the design sheet from your embroidery software, cut it out and lay it on the garment in the exact location you want to place it, and mark it that way. If you are using a unisex garment, make sure that you move the design up for a women. You do not want it to appear too low or hit in the center of her breast.
Download, print out, and laminate your Left And Right Chest Placement Charts.
This will give you a tool that you can use on a daily basis and will last a long time. You can even write notes on it with an erasable marker.
Link to Charts: T-Shirt-PoloShirt-DressShirt Placement Chart
Sweatshirt-Jacket-Sweater-Robe-Placement
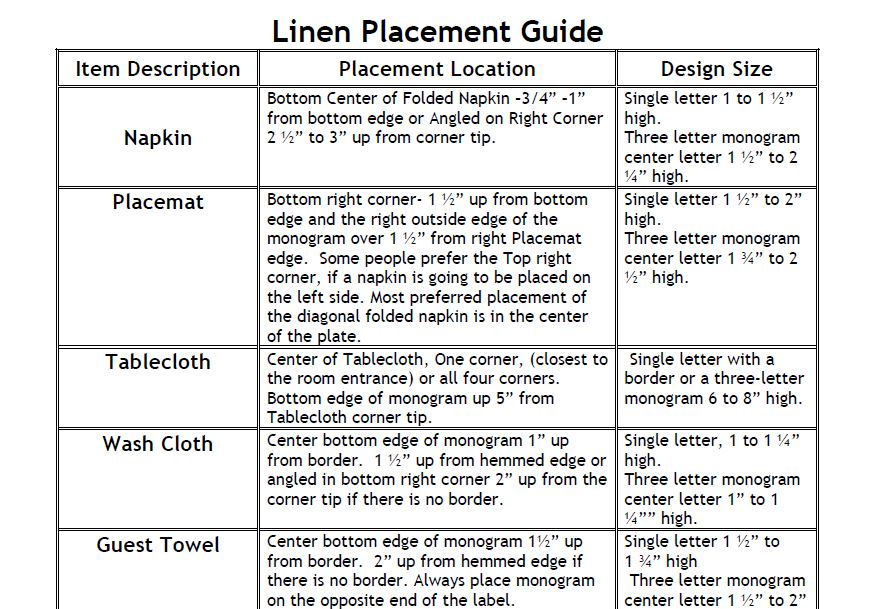
Embroidery And Monogram Placement Guide For Linen
This Linen Monogram Placement Guide is only a guide line and should be used accordingly. The sizing of the monograms used on linens is based on the size of the item that you are going to be working with. Sometimes an item can be large but is so delicate that you would not want to embroider a heavy monogram.
Download and print out the Linen Monogram Placement Guide. Lay pages 1 and 2 down with wrong sides together and laminate them. This will give you a guide that you can use for a long time. You can even write notes on it with an erasable marker.
I have found that most linen items look richer when you embroider them with cotton thread. This is not always possible because of the availability of colors. The next best choice is the polyester thread because of its durability and ease with laundering.
Always use 2 layers of medium weight crisp tear away backing. The crispness helps it to tear away clean and gives you a better finish.
Link to Chart:Linen Placement Guide
Guide: Logo Placement On Golf Towels Or Fingertip Towels
These Placement Guides will show you different placements for embroidery designs on golf towels or fingertip towels. When working with golf or fingertip towels make sure that you use 2 layers of a crisp tearaway backing and a topping on the surface. Without the topping, you will have jagged edges in your design and the loops in the terry will pop up. The Flat Golf Towel guide will show you 3 different placements and the Folded Golf Towel guide will show you 2 placements.
Click on the links below, print out each one of the Placement guides, and place them in your Embroidery Information Binder for quick reference.
Link to Flat Golf Towel Guide:Logo Placement on Flat Golf Towel
Link to Folded Golf Towel Guide: Logo Placement on Folded Golf Towel
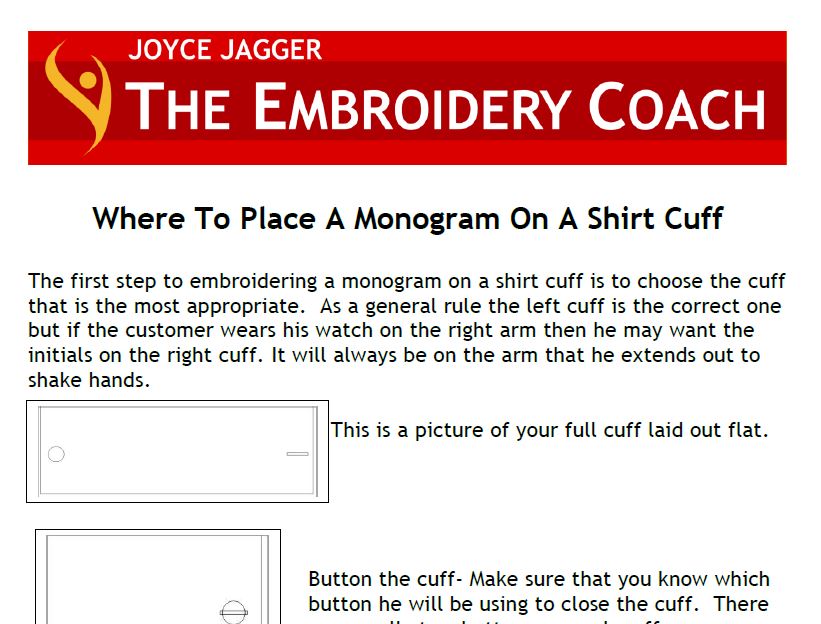
Guide: Where To Place A Monogram On A Shirt Cuff
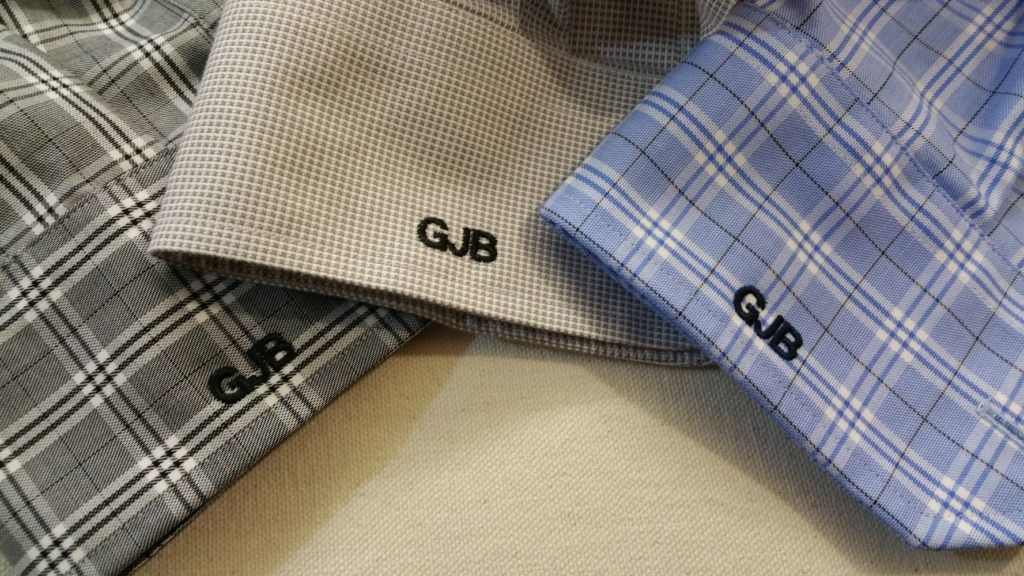
In this monogram placement guide, I show you where to place a monogram on a man or ladies shirt cuff. As a general rule the left cuff is the correct one, but if the customer wears a watch on the right arm, then he or she may want their monogram on the right cuff. If you are monogramming on shirt cuffs that have stripes or plaids, you must make sure that your monogram follows a straight line as in the picture below.
Print out the Shirt Cuff Monogram Placement guide and place it in your Embroidery Information Binder for easy reference.
Link to Guide: Monogram Placement on a Shirt Cuff
Article: Marking And Hooping Above Pockets With No Hooping Device
Marking and Hooping for embroidery above pockets without using a hooping device can be a little tricky, but if you follow some basic rules, you will be very successful. When you are placing a design above a pocket, make sure that the design is not too high and extends too close to the neck. The bottom of the design should be no closer than one-half inch to the top of the pocket. If it is too large it would be better to place it on the opposite side of the garment centered with the pocket. You also must place the design in line with the pocket edge. If the pocket edge is slightly crooked, you still have to go by that line and not the center line on the shirt. Download and print out this article for your embroidery binder.
Link to Article: Marking and Hooping Above Pockets

Article: Embroidery Placement On Robes
This document shows you all of the settings that I have used for many years. These settings should work for the placement of your left or right chest embroidery or monograms on robes. It is very much the same as a left or right chest measurement for a jacket. I have also been asked about a design on the back of robes. You would place them the same as you would a jacket back.
Link to Article:Embroidery on Robes
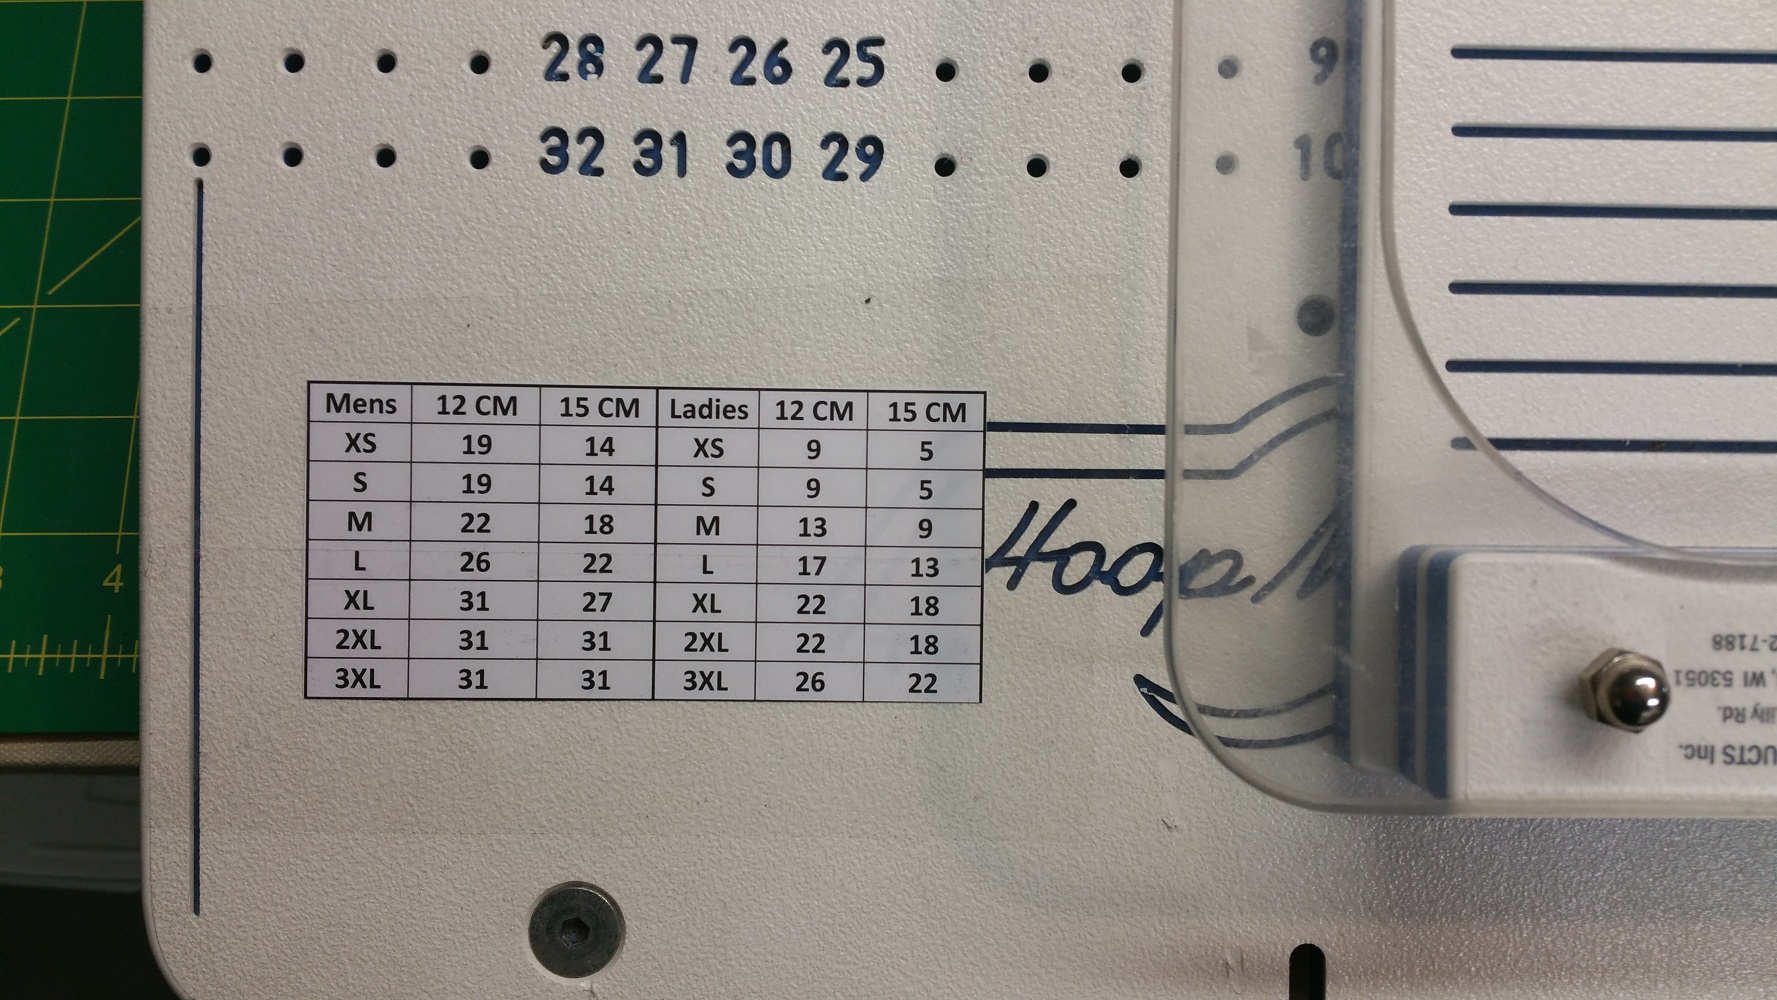
Article: Hoop Master Settings
This document shows you all of the settings that I have used for many years. These settings should work for the placement of your left or right chest embroidery designs. You will see that there are settings for both Men and Ladies. There are also different settings for whether you are using the 12 cm hoop or the 15 cm hoop. That is because the center of the hoop is held in a slightly different position on the board with each of these hoop sizes. In order to keep the center of the 15 cm. hoop in the same location on the board as the center of the 12 cm. hoop, you need to move it up one hole position.
For Magnetic Hoops: If you are using the Magnetic hoops, you will need to make some adjustments to the numbers. They are a little different. Mark your garment using the Left Chest Placement guide and slide it over the HoopMaster and find the center of the hoop. Move your Magnetic Hoop template to the right position that will be in the center of the design. That is the number that you will use for the size of the garment. Repeat this process for each size until you have each one charted. This will be your new chart.
Print these settings out and attach them to your HoopMaster.
Link to Article: HoopMaster Settings