
Embroidery machine maintenance needs to be done every single day. There are embroidery machine maintenance procedures that need to be followed daily, weekly, every 3 months, and every 6 months. Not only is your embroidery machine your workhorse, it is a very valuable piece of equipment. It does not matter if you are a one head or a multiple head shop, maintenance is a must. It only takes a few minutes, but the benefits are priceless.
 To watch the videos in full-screen mode, click on the “Enter Full Screen” icon on the right bottom corner of the video.
Video: My Favorite Embroidery Machine Maintenance Tools
In this embroidery training video, I go over the list of my favorite embroidery machine maintenance tools. Many of the basic tools that I use for my embroidery machine maintenance came with the embroidery machine when I purchased it. The remainder of them I purchased at a local hardware store. They are all simple and easy to find. Click on the link below of the list of my Favorite tools so that you can print it out and take it with you when you go to purchase your tools.
Link to Tool List: My Favorite Tools for Maintenance
Video: Important Daily Maintenance For Your Embroidery Machine
In this video, I will show you how to perform your daily embroidery machine maintenance. The daily maintenance is very important to keep your machine running trouble free. There is nothing more annoying than constant thread breaks. You will also want to download and print out the Daily Machine Maintenance Guide, the Daily Embroidery Machine Maintenance Schedule, and The Needle Replacement Sheet. You will be using them when you are performing your maintenance. Place them in your Embroidery Machine Maintenance Binder.
Link to Daily Machine Maintenance Guide:Daily Maintenance Guide
Link to Daily Embroidery Machine Schedule:Daily Maintenance Schedule
Link to Needle Replacement Sheet: NeedleReplacementSheet
Video: How To Perform Weekly Embroidery Machine Maintenance
In this video, I will show you how to perform the weekly embroidery machine maintenance. At the end of every week a complete clean up should be done. Not only is this your workhorse, it is a very valuable piece of equipment. It does not matter if you are a one head or a multiple head shop, weekly maintenance is a must. It only takes a few minutes, but the benefits are priceless. Make sure that you turn off your machine for your maintenance.
Download and print out the Weekly Embroidery Machine Maintenance Guide and the Weekly Embroidery Machine Maintenance Schedule. Place them in your Embroidery Machine Maintenance Binder to use while you are performing your maintenance.
Link to Guide: Weekly Maintenance Guide
Link to Schedule:WeeklyMaintenance Schedule
Video: 3 Months Embroidery Machine Maintenance
I find it easy to schedule the 3 Months embroidery machine maintenance the first week in January, April, July, and October. If I keep on the same schedule that tax quarters are on, it is very easy to remember. The end of the first week is usually the best for me, but sometimes I have to vary that depending on my schedule. I do this quarterly embroidery machine maintenance in conjunction with the weekly maintenance. Make sure that you turn off your machine before you start your maintenance.
Download and print out the 3 Months Embroidery Machine Maintenance Guide and the 3 Months Embroidery Machine Maintenance Schedule. Put them in your Embroidery Machine Maintenance Binder and have them handy to use when are performing your 3 Months maintenance.
Link to Guide: 3 Months Maintenance
Link to Schedule: 3Months Maintenance Schedule
Video: 6 Months Embroidery Machine Maintenance
In this video, I show you how to perform your 6 month’s Embroidery Machine Maintenance. This is very important in order to keep your machine running without issues or unnecessary down time. If your machine is not running, you are not making money. The 6 months embroidery machine maintenance should be done on a regular schedule along with your weekly and 3 months maintenance. I schedule mine in January and July. It is easy to remember when you have it on the calendar.
Download and print out the 6 Months Embroidery Machine Maintenance Guide and the 6 Months Embroidery Machine Maintenance Schedule. Place them in your Embroidery Machine Maintenance Binder so that you can refer to them as you are performing your 6 months maintenance.
Link to Guide: 6 Months Maintenance
Link to Schedule: 6MonthsMaintenanceSchedule
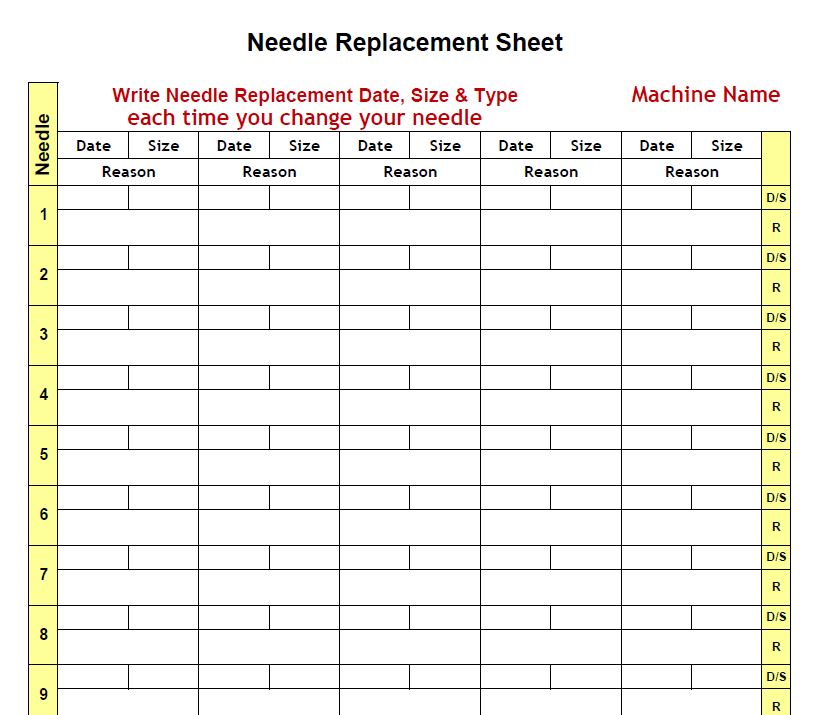
Form: Embroidery Machine Needle Replacement Sheet
This is a Needle Replacement Sheet that you need to print out and keep with your embroidery machine. When you change your needle, make sure that you use this Needle Replacement Sheet to keep track of when you changed your needle in each needle bar and what size and type of needle it is.
This is a very valuable tool when you are trouble shooting problems. This is a new form that was updated by one of my students, Alisa Davis, who is extremely talented with computers, web creation, and about any form that you would need. Thank you Alisa for doing this!
Link to Form: NeedleReplacementSheet
Video: How To Adjust The Embroidery Machine Top Stitching Thread
In this video, I show you how to adjust your embroidery top stitching thread tension. For this I use a Thread tension gauge. For years I adjusted my tension by feel, but after I started using the Thread tension gauge, I had much more control of my tensions and the machines run a lot smoother with less tension problems. Maintaining a balanced tension between your upper thread and bobbin thread is very important for high quality trouble free embroidery.
Click on the link below to download and print out the article Keeping Your Thread Tensions Balanced. It has a picture of both of the Tension gauges in it that I use. Print it out and keep it in your Embroidery Information Binder.
Link to Article: Keeping_The_Thread_Tensions_Balanced_On_Your_Embroidery_Machine
Video: How To Adjust The Bobbin Tension
In this video, I will show you how to adjust the bobbin tension. I have found that by using the Towa bobbin tension gauge I can get and maintain a more accurate bobbin tension. The drop test is very widely used and that was the method that I used for many years until I discovered this handy bobbin tension gauge. My embroidery machines run more smoothly since I started using this handy little tool!
Video: Solving An Embroidery Machine Bobbin Tension Problem
In this video, I will show you how I found a problem with a bobbin in my embroidery machine that I would never have been able to solve if I had not had the bobbin tension gauge. The bobbin tension gauge has become an invaluable tool for me! You can purchase it from almost any company that sells embroidery supplies.
Video: How To Take Care Of Your Embroidery Cap Frames
In this video, I show you how to properly care for your embroidery cap frames. It is very important to treat them with care. You do not want to throw them in a box or bin. They must be hung up or laid down carefully with the straps hooked in place. The frames are very expensive and the straps can be damaged very easily.
Video: How To Adjust The Tajima Embroidery Machine Cap Driver
In this embroidery training video, I show you how to make adjustments to the Tajima embroidery cap driver. It is very important to have your cap driver at the correct height for the different style caps. If you are embroidering on a high profile cap you want it set at the highest setting and at the lowest setting for a low profile cap. This makes a huge difference in the quality of your design.
When you purchase your machine the cap driver is usually factory set for an average cap. Some cap drivers have multiple adjusting points while others are a little more limited.
Not all embroidery machine cap drivers adjust the same. This will depend on the brand of embroidery machine you have and the age of the machine. Make sure that you check your embroidery machine manual to see what adjustments are applicable to your cap driver and cap frame.
Video: How To Install The Hoop Tech Embroidery Clamping System
In this embroidery training video, I show you how to install the Hoop Tech embroidery clamping system. This hooping clamp makes it much easier to work with hard to hoop items.
This is the ICTCS model that you see in the video which mounts on the tubular arms of the machine. Hoop Tech also makes another model, the Slim Line, that mounts directly to the drive rail of your embroidery machine.
Video: Installing The Cylindrical Frame Attachment On The Tajima
In this embroidery training video, I show you how to install the Cylindrical Frame attachment for the Tajima Embroidery machine. This small cylindrical frame is really handy for embroidering inside of long thin bags like a wine bottle bag, or on socks, down a sleeve or leg, and inside of a shirt pocket.
Video: Installing A Border Frame & Hooping Fabric For Patches
In this video, I will show you how to install the border frame on the embroidery machine. The border frame is an optional hooping frame that is used to create patches and embroidery in very large areas such as the center of a banner. I will be showing you how to place the fabric into the border frame for embroidering patches.